We are excited to announce the launch of our new HubRise integration! This powerful tool centralizes your orders from platforms like Uber Eats, Deliveroo, and Takeaway.com directly into your Restomax system. By streamlining your workflow, you can reduce clutter and focus on what matters most: your food and your customers.
Here is how you can get started in just a few simple steps.
Step 1: Initialize from Your Restomax Backoffice
You can kick off the entire process directly from your Restomax interface:
- Enable the Integration: Log in to your Restomax backoffice and navigate to Settings > Integrations > HubRise.
- Connect & Create: Click on "Connect to HubRise". From here, you can create your HubRise account immediately if you don't already have one.
- Grant Restomax Access: To allow our technical team to finalize the setup, go to your HubRise account settings under Permissions and add [email protected] as a partner.
Check out our detailed instructions: How to enable Hubrise in Restomax
Step 2: Prepare Your Menu (Catalog)
Before going live, you need to sync your menu with the delivery platforms:
- Matrix Template: Select or configure the Matrix Template in your Restomax backoffice that you wish to use for online ordering.
- Push the Catalog: Once your template is ready, click "Send Catalog" (Envoyer le catalogue) on the integration page to sync your products and prices with HubRise.
- Configure Opening Hours: Opening Hours can be pushed from Hubrise to Delivery Platforms if they are configured. Check out these instructions to configure opening hours for your store.
Check out our detailed instructions for setting up a Matrix Template: https://www.restomax.be/en/blog/caisse-3/create-a-sales-matrix-122
Step 3: Set Up Your HubRise Dashboard
To make management easier, we recommend adding these essential tools within your HubRise account:
- Catalog Manager: Add this connection to preview exactly how your menu, variants, and prices will appear on third-party platforms.
How to add Catalog Manager. - OrderLine: Install the OrderLine app in HubRise. This acts as your central hub to accept and manage orders, allowing you to move away from using multiple individual tablets for each platform. How to Install OrderLine.
Step 4: The Restomax Team Takes Over
Once you have initialized your account and pushed your catalog, it’s our turn to handle the technical heavy lifting.
- Send Us Your Info: Email us the specific information regarding the platforms you wish to connect (Uber Eats, Deliveroo, or Takeaway.com) using our provided email templates. See "Information Needed for Platform Connections" for details.
- Onboarding Phase: Our team will then attach your entity to the Restomax billing account, configure your opening hours, and finalize the bridge between HubRise and your chosen delivery channels.
What happens next? We will monitor the connection process and notify you as soon as the onboarding is complete. Once we give you the green light, your orders will flow directly into Restomax!
Detailed Instructions
How to enable Hubrise in Restomax
1. Open the Hubrise Integration in Restomax
Login to the Restomax Backoffice (https://backoffice.restomax.comNavigate to Settings -> Integrations and locate Hubrise. Open Hubrise, then click on "Install Integration" or "Modify". Select the store in which Hubrise needs to be linked. Then select "Connect With Hubrise".
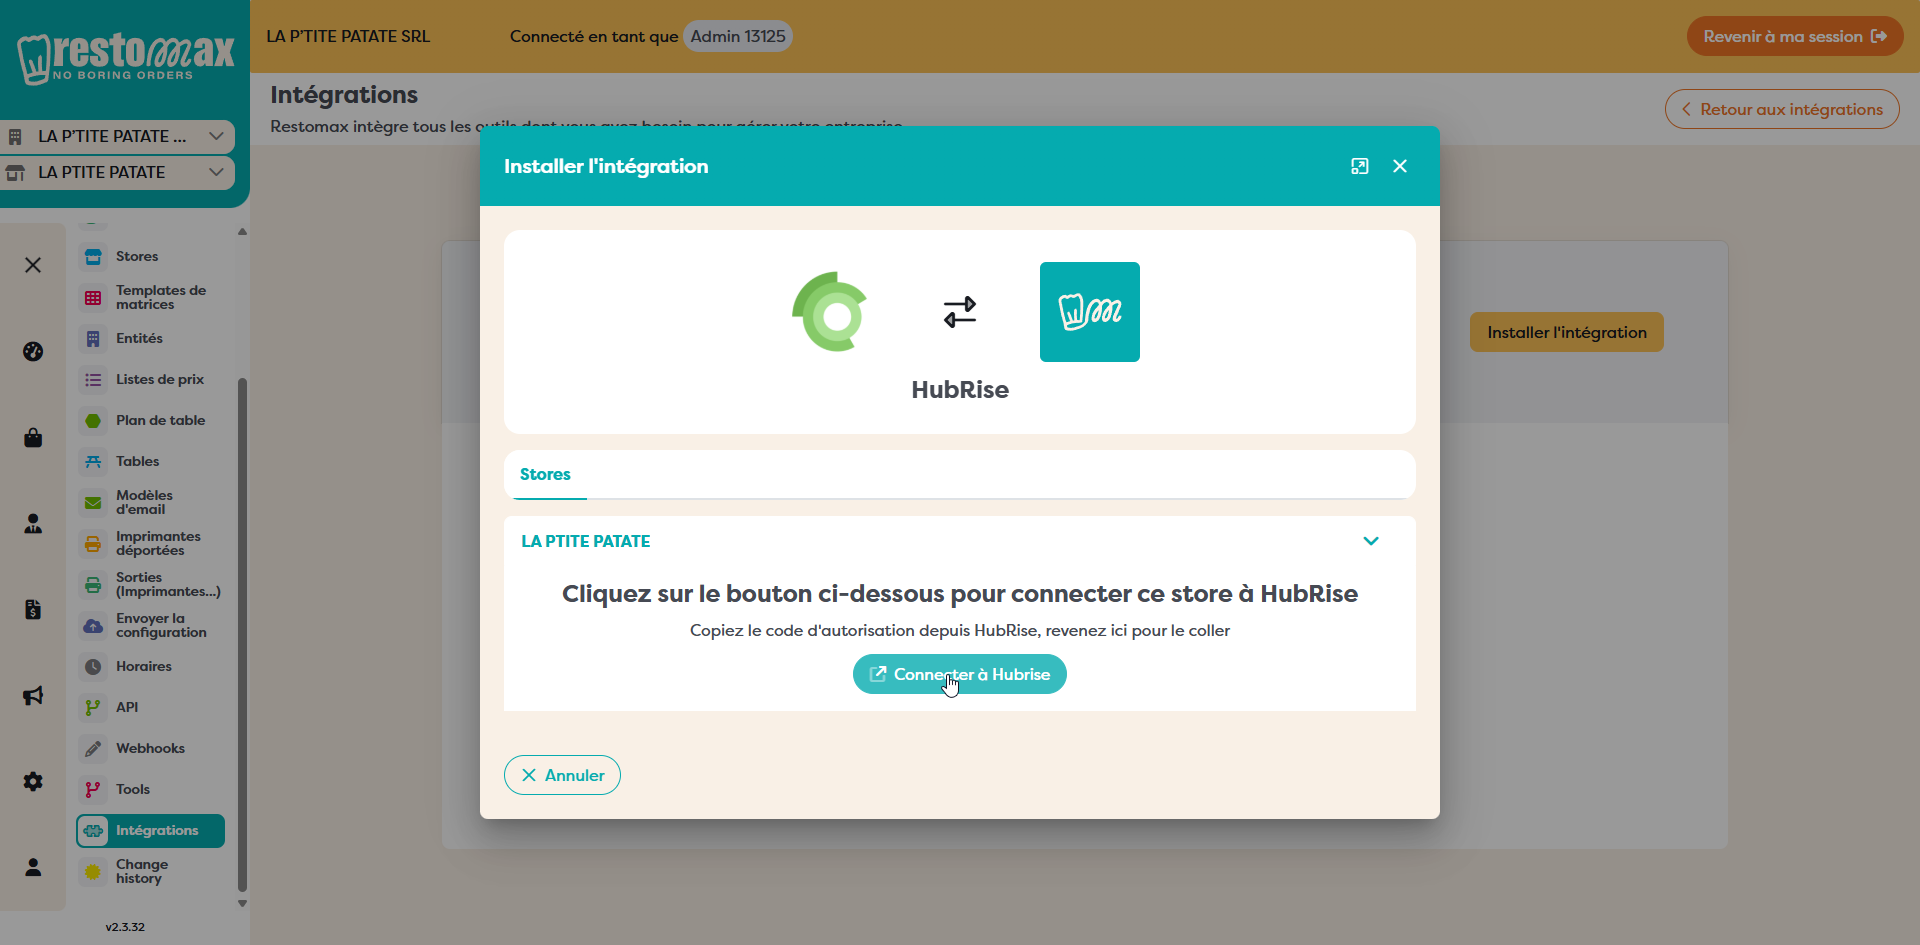
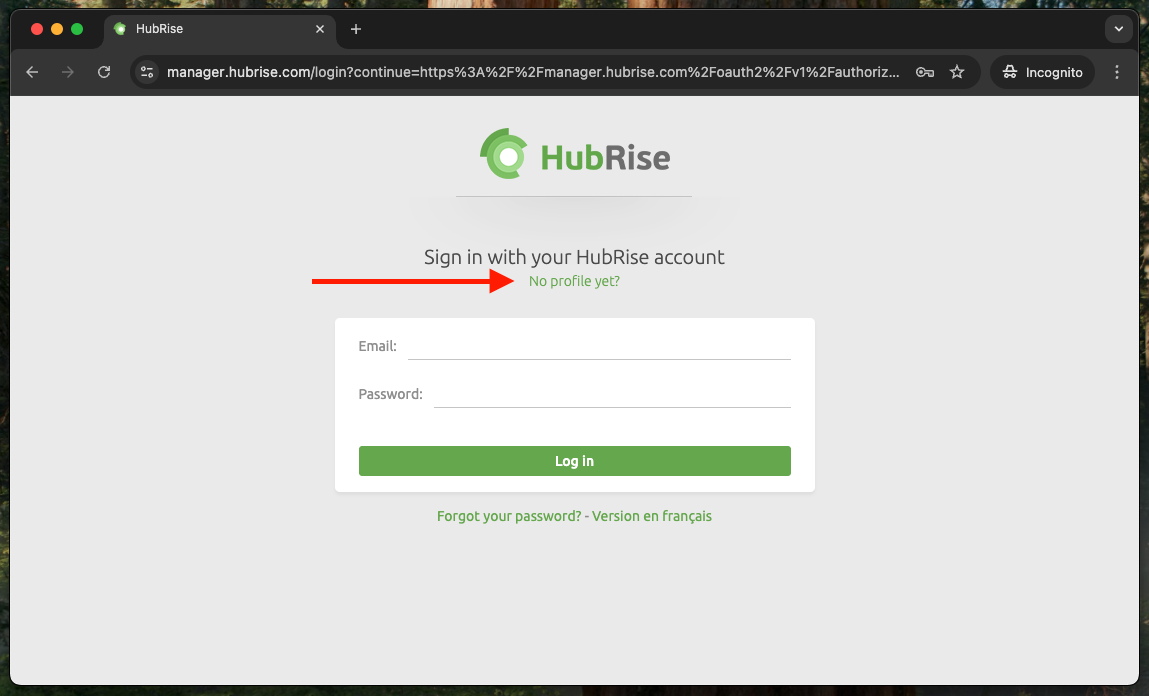
2. Log In or Create a HubRise Account
The HubRise login page will open. If you already have a HubRise account, enter your credentials and log in. If you don't have an account yet, click "No profile yet?" to create one.
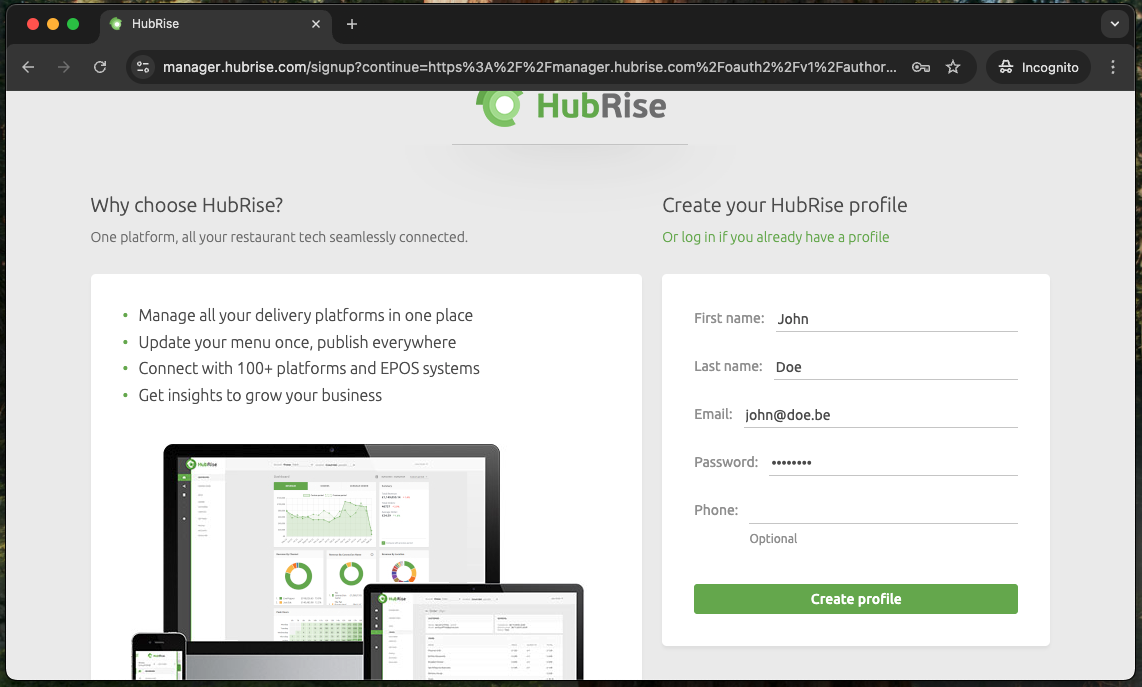
3. Create Your HubRise Profile
Fill in your details: First name, Last name, Email, and Password. Then click "Create profile".
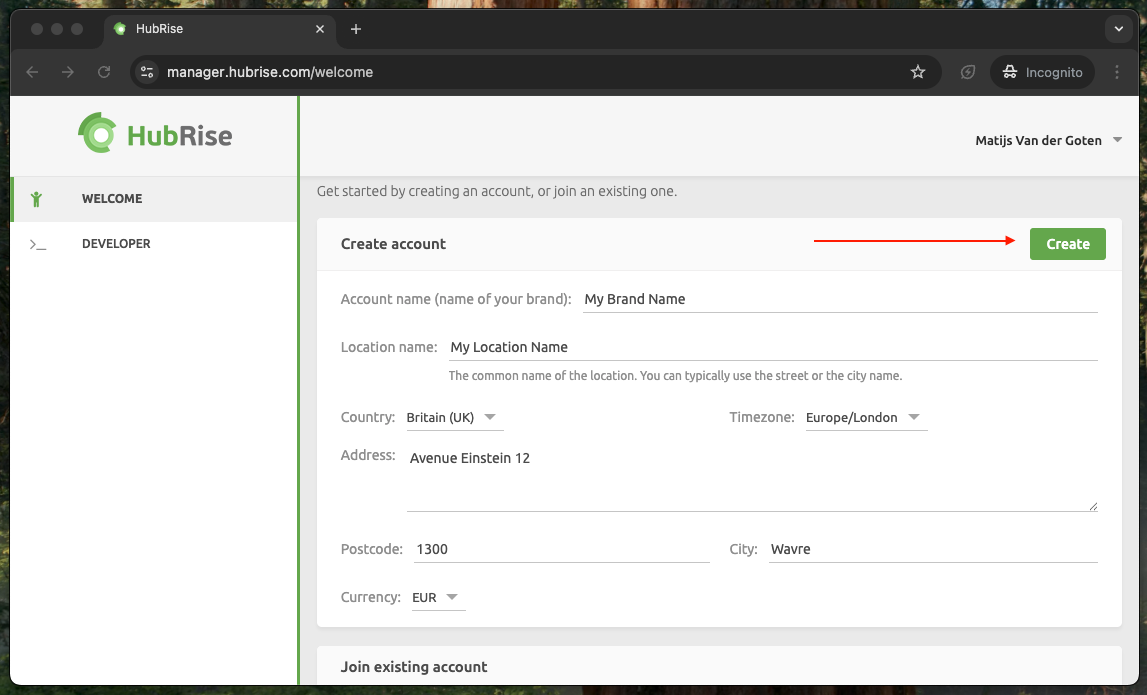
4. Create Your Account and Location
After creating your profile, you'll be prompted to create a location. Click "Create a new location".

Fill in your account details: Account name (your brand name), Location name (typically the street or city name), Country, Timezone, Address, Postcode, City, and Currency. Click "Create" to continue.
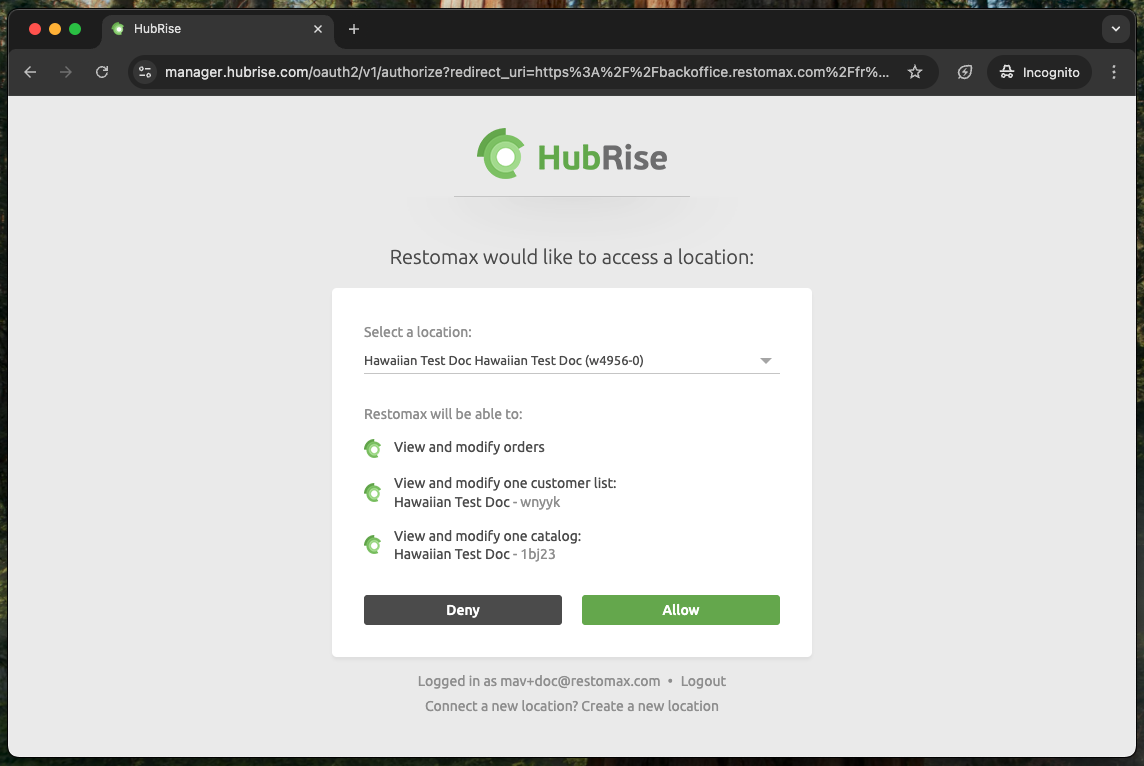
5. Authorize Restomax to Access Your Location
If after creation, you don't see the "access location" screen. Go back to the Restomax backoffice, back to the Hubrise integration, and click Connect again. Log in (you are probably already logged in) and you'll see the "access location" screen.
HubRise will ask you to confirm that Restomax can access your location. Verify that the correct location is selected, then click "Allow" to grant Restomax the necessary permissions to view and modify orders, customer lists, and your catalog.
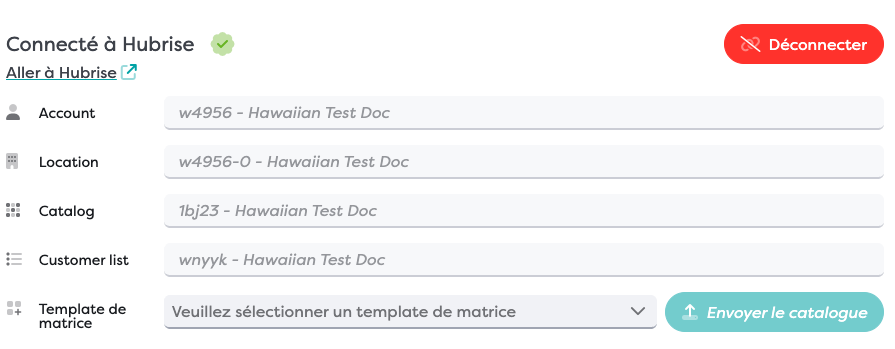
6. Confirm Connection and Select Matrix Template
You will be redirected back to Restomax. You should now see "Connected to HubRise" (Connecté à Hubrise) with a green checkmark. Select the Matrix Template you want to use for your online ordering menu, then click "Send Catalog" (Envoyer le catalogue) to push your products to HubRise.
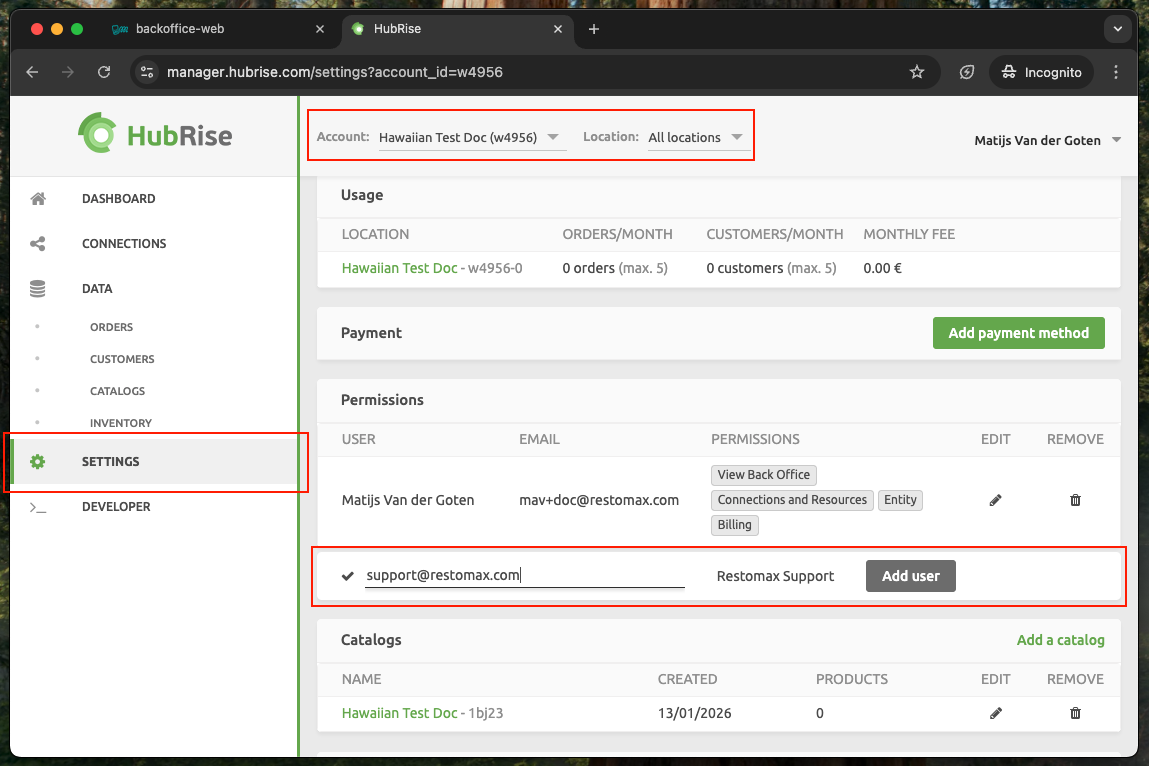
7. Grant Restomax Support Access
To allow the Restomax team to complete the platform connections, you need to add us as a user on your HubRise account. Go to manager.hubrise.com, select your account, then go to Settings. Scroll down to Permissions and enter [email protected], then click "Add user".
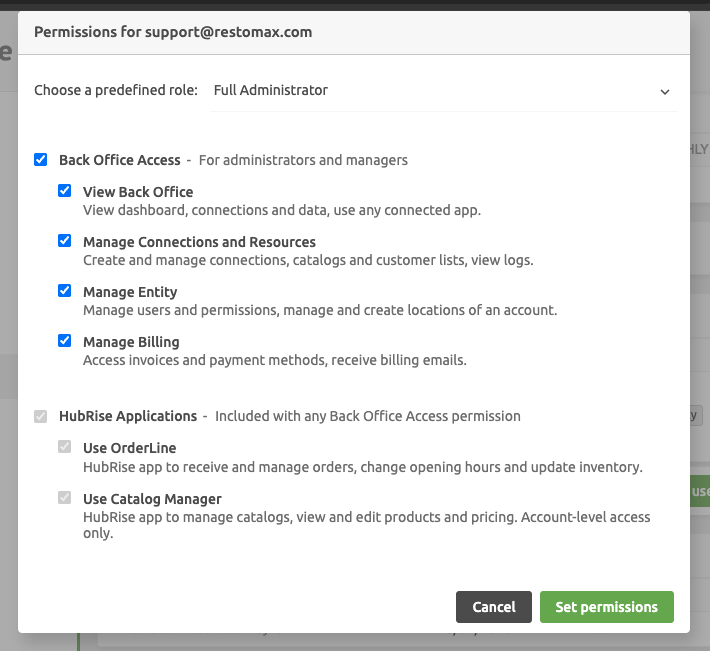
When prompted, select "Full Administrator" from the predefined roles dropdown, then click "Set permissions".
8. (Optional) Grant your Partner support Access
Follow the instructions on step 7 above, but fill in the email address of your Restomax Partner. The Partner can provide you with their correct email.
Done! Your HubRise account is now connected to Restomax, your catalog has been pushed, and our support team has access to finalize the platform connections. We will contact you once everything is ready!
How to Set Opening Hours in HubRise
Opening hours configured in HubRise are automatically sent to your connected delivery platforms. Here's how to set them up:
1. Log in to manager.hubrise.com and select your account and location.
2. Go to Settings in the left menu.
3. Click on "Modify location".
4. Scroll down to Opening hours and click "Set opening hours".
5. For each day, click "Open the day" and enter your opening and closing times. Use "Copy to bottom" if all days have the same hours.
6. Click "Update" to save your changes.
Note: Opening hours are automatically synchronized to platforms like Uber Eats and Deliveroo when automatic push is enabled in their bridge configuration.
Information Needed for Platform Connections
To connect your restaurant to delivery platforms via HubRise, please send us the following information by email:
Deliveroo Connection
Estimated timeframe: approximately 2-3 days
Please provide:
• Restaurant Name
• Deliveroo ID (found in your Deliveroo dashboard URL)
• Deliveroo URL (link to your restaurant on Deliveroo)
• Restaurant Email Address (used to log in to Deliveroo dashboard)
• Existing third-party connection: Are you connected to another integration (e.g., Rushour, Deliverect, Lightspeed)? If yes, which one?
Takeaway (Just Eat) Connection
Estimated timeframe: approximately 7 days
Please provide:
• Restaurant Name
• Just Eat URL (link to your restaurant on Just Eat/Takeaway)
• Existing third-party connection: Are you connected to another integration?
Important: Connecting to HubRise will disconnect and remove any existing integration with another application. Please confirm in writing that you are aware and agree to this.
Uber Eats Connection
Estimated timeframe: instant (or manually approximately 2-3 days)
For Uber Eats, we will send you a unique authorization link. Simply click the link and follow the instructions to authorize HubRise access to your Uber Eats account. No additional information is required from your side.
How to Add Catalog Manager in HubRise
The Catalog Manager is a free app that lets you preview and edit how your menu will appear on third-party platforms. It's useful for verifying that your products, prices, and variants are correctly configured before going live.
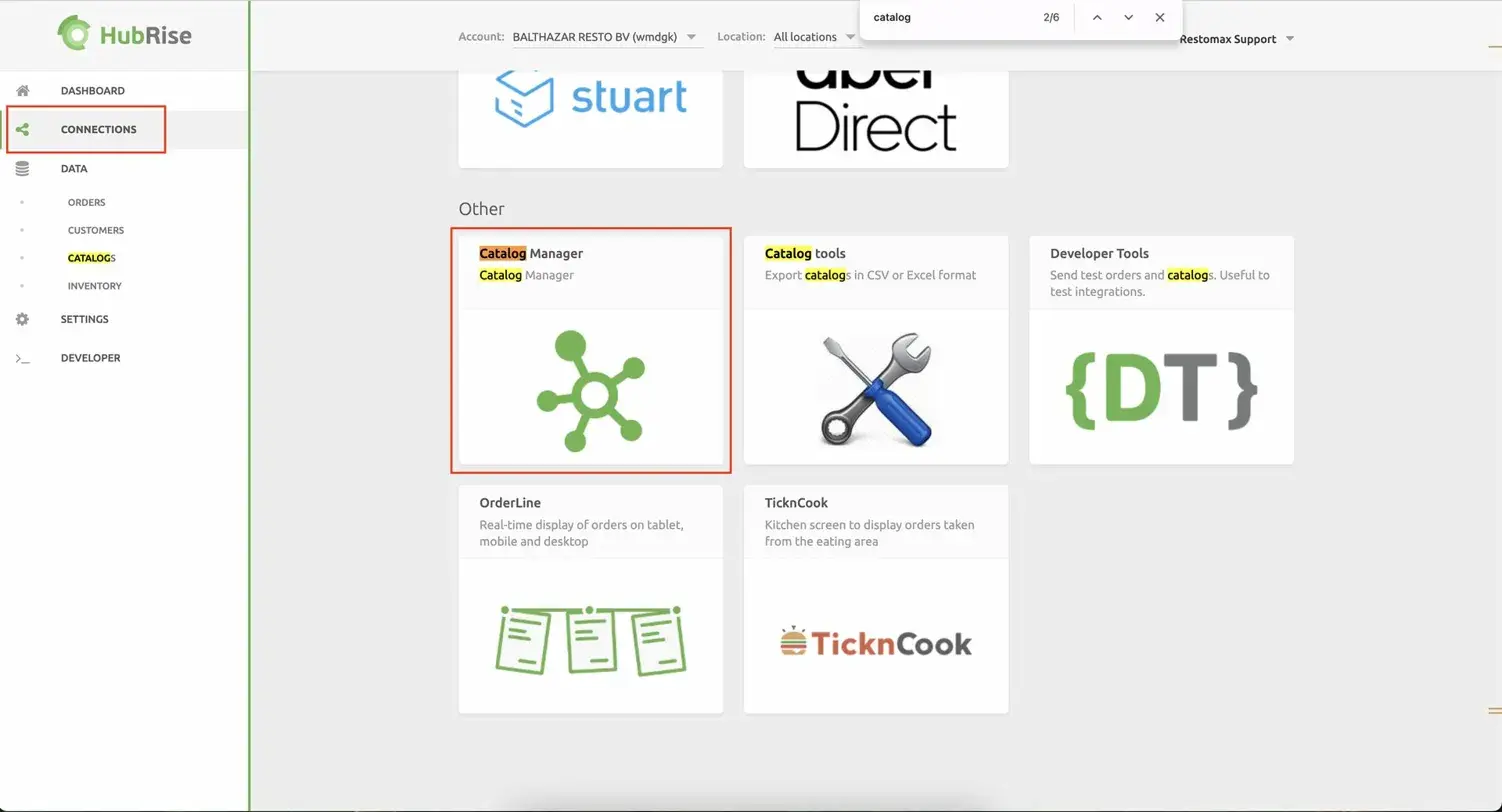
1. Navigate to Connections
Log in to manager.hubrise.com and select your account. Click on Connections in the left sidebar. Scroll down to the Other section and click on Catalog Manager.
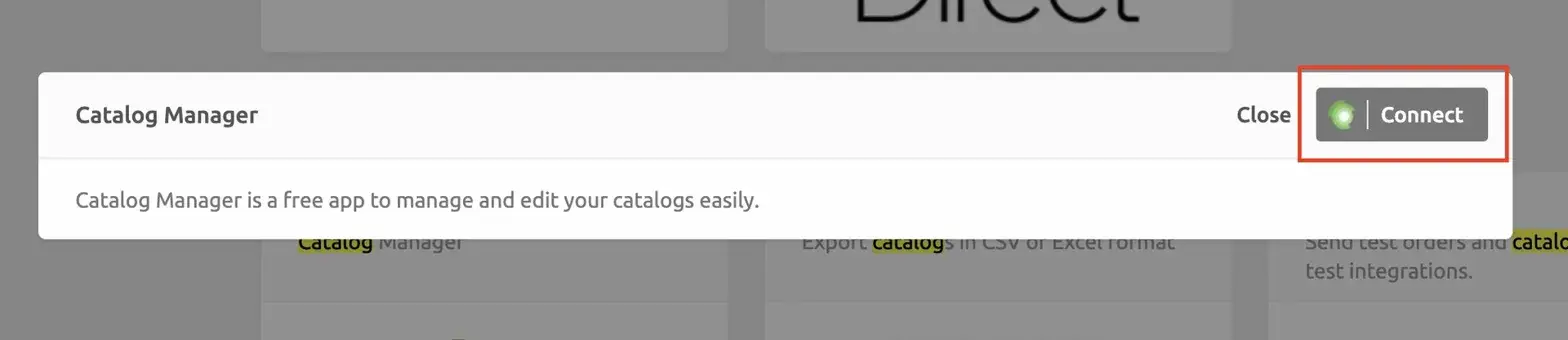
2. Connect Catalog Manager
A popup will appear describing the Catalog Manager. Click the "Connect" button to add it to your account.
3. Preview Your Catalog
Once connected, open the Catalog Manager from the Connections page. Use the Grid view to see all your products at a glance, including the Default prices and any platform-specific variant prices (e.g., UberEats-Deliveroo). This is helpful to verify that prices are correctly configured for each platform.
Tip: Use the Preview tab to see how your menu will look on delivery platforms.
Do not edit any values here. When pushing the menu from Restomax, changes made here will be overwritten.
How to Install OrderLine in HubRise
OrderLine is a HubRise app that provides a real-time display of orders on tablet, mobile, and desktop. It allows you to manage all your delivery platform orders from a single interface instead of using multiple tablets.
Key features of OrderLine:
- Accept and manage orders from all connected platforms in one place
- View a summary of upcoming orders
- Manage inventory (mark items as out of stock)
- Adjust opening hours on the fly
- Enable "Rush Mode" to temporarily pause incoming orders during peak times
Installation Steps
- Log in to manager.hubrise.com and select your account.
- Go to Connections in the left sidebar.
- Scroll down to the Other section and click on OrderLine.
- Select the store/location you want to add it to.
- Click Connect to complete the installation.
Note: OrderLine should only be used to "pause" orders in emergency situations. For regular opening hours management, configure your hours in HubRise Settings so they automatically sync to all platforms.
How to Configure Catalog Variants
Catalog variants allow you to set different prices for different delivery platforms. For example, you might want to charge higher prices on Uber Eats and Deliveroo to account for their commission fees, while keeping lower prices for in-store orders.
How It Works
In Restomax, Price Lists are used to create catalog variants. When you push your catalog from Restomax to HubRise, any configured price lists are automatically sent as variants.
- In your Restomax backoffice, create or configure Price Lists with the prices you want for each platform.
- When you push the catalog to HubRise, the price lists will appear as variants.
- Use the Catalog Manager in HubRise to preview and verify the variant prices. In the Grid view, you can see both the Default price and platform-specific prices side by side.
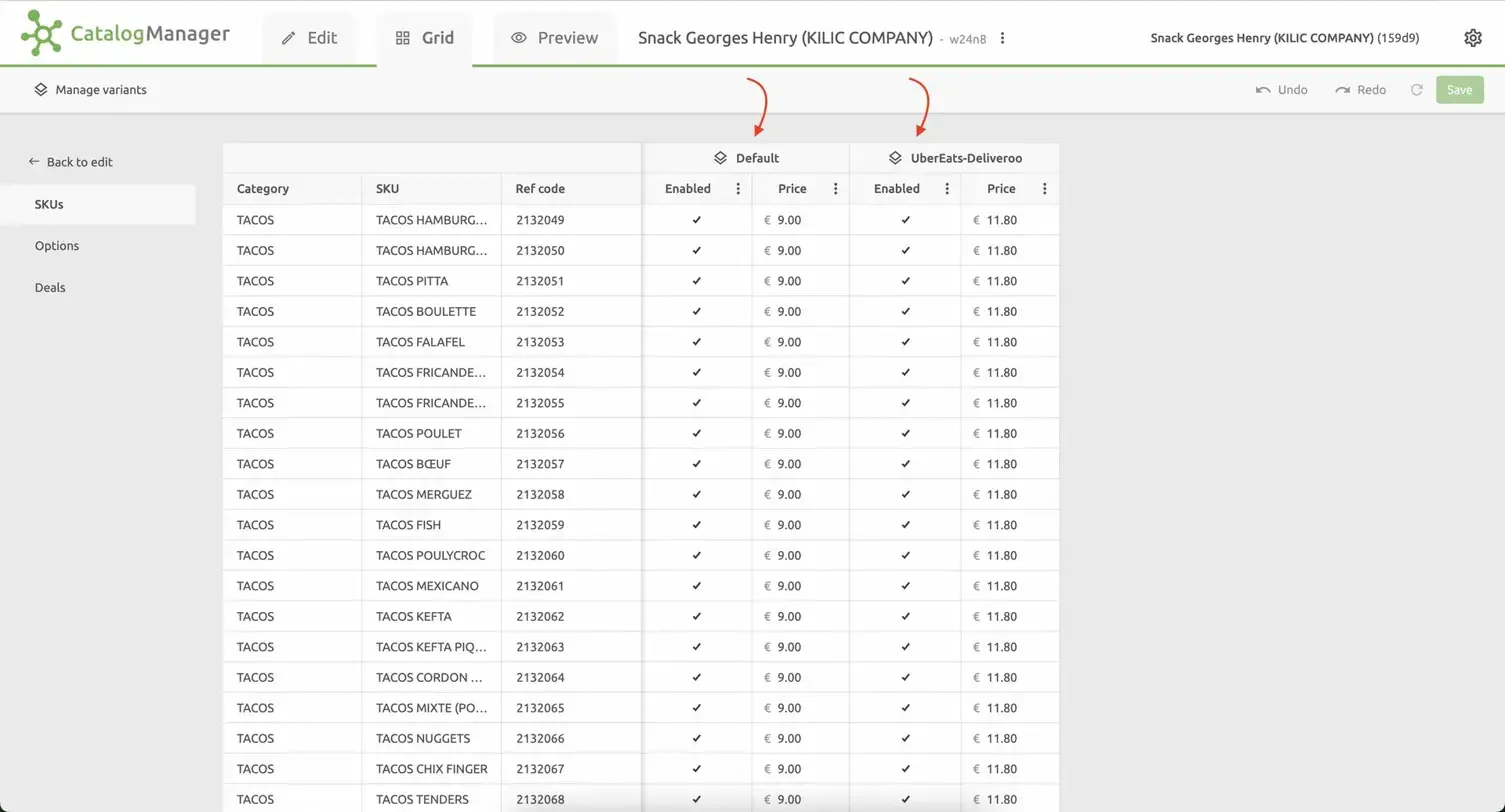
In the example above, products show both a Default price (€9.00) and an UberEats-Deliveroo variant price (€11.80). The platform bridges will automatically use the appropriate variant price when sending your menu to each platform.
Questions?
If you have any questions about finding these identifiers or need assistance, please don't hesitate to contact us at [email protected].