What it is
A cashless wallet is prepaid credit that belongs to the customer. They load money onto it in advance, then pay with the balance instead of reaching for a card each time. It is how canteens, festivals and clubs have always worked, and it is now part of your webshop.
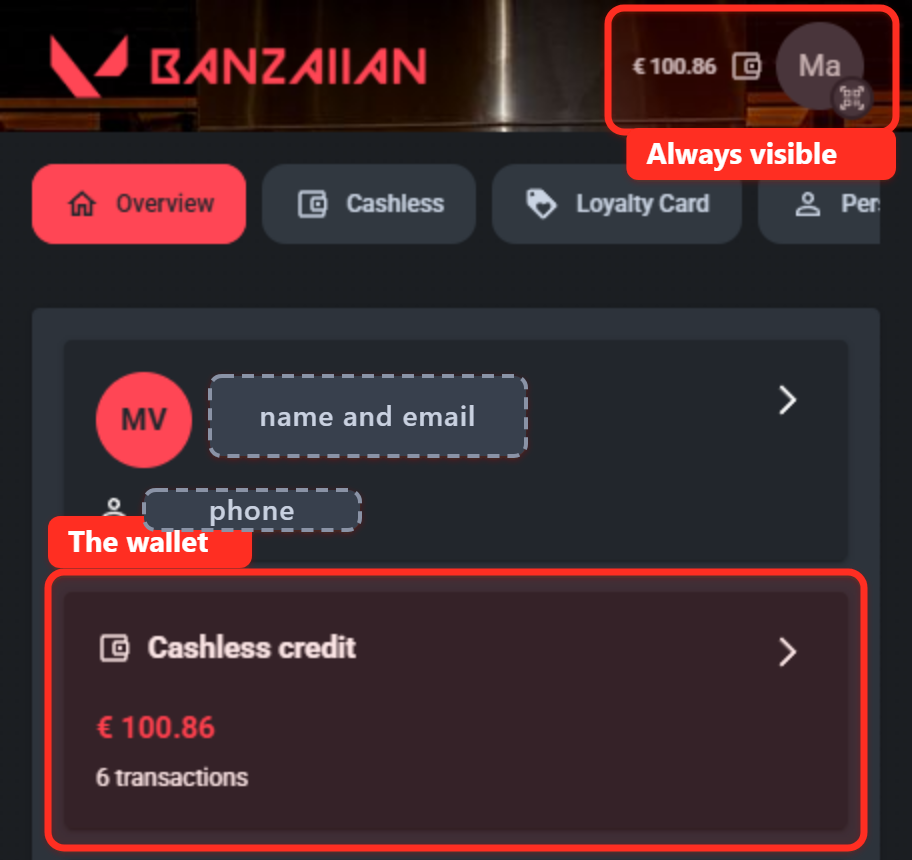
1. The customer has a balance, and can always see it
The balance lives in their account and follows them everywhere on the site or app.
2. They top it up online
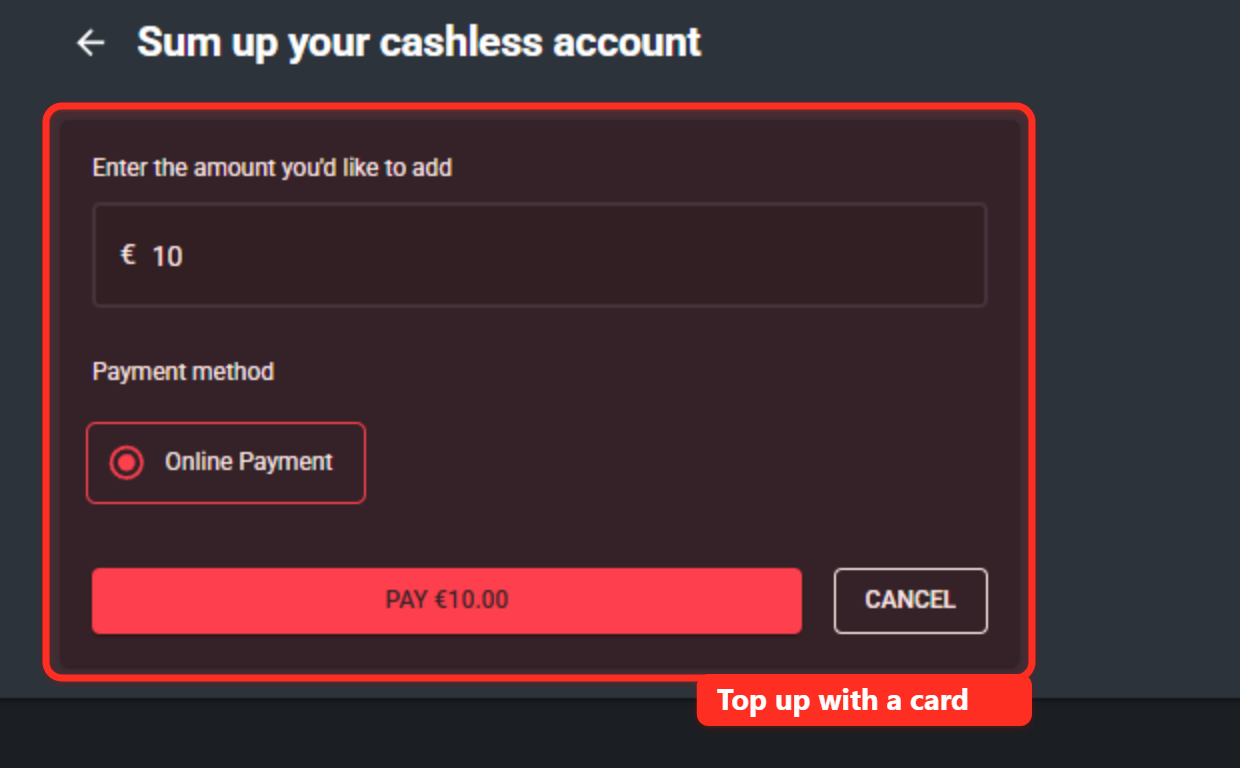
No queue, no terminal, no waiting for someone at the counter. They enter an amount, here 10.00 €, pay with a card, and the balance updates as soon as the payment is confirmed.
3. They spend it in the store
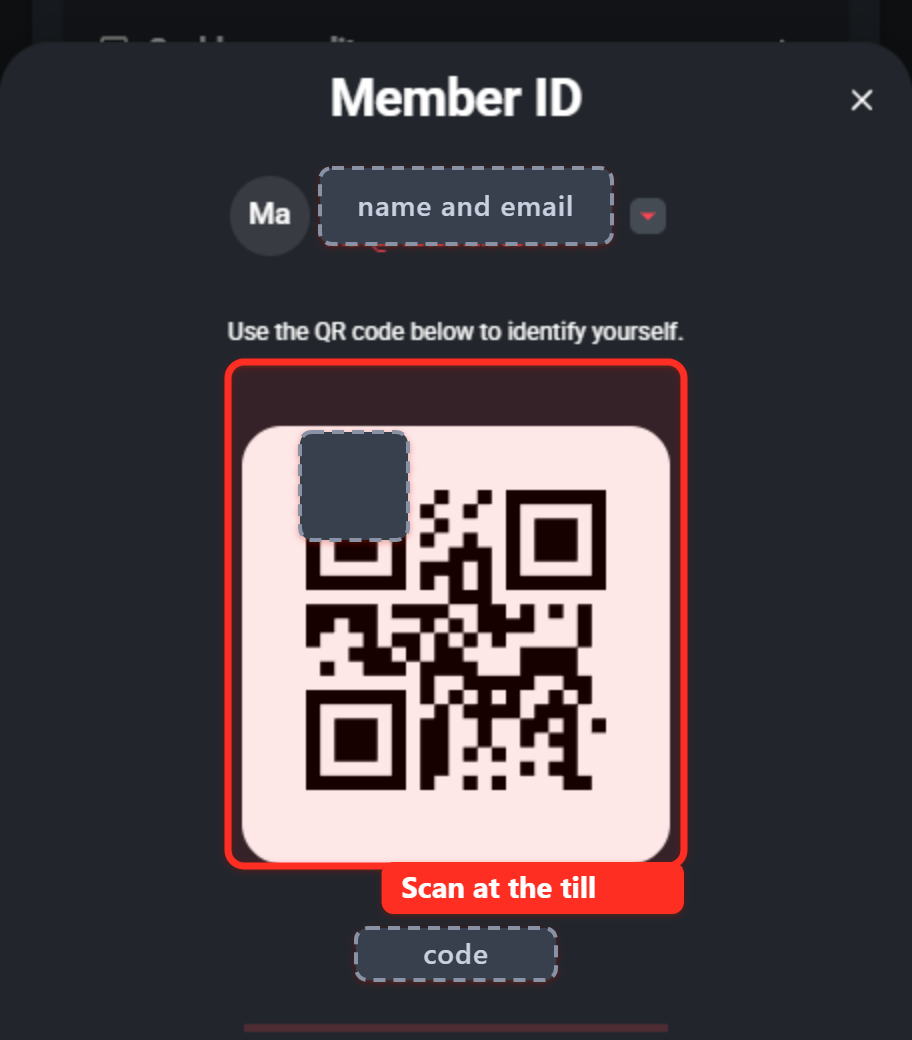
Tapping the avatar opens their Member ID: a QR code that staff scan on the POS, or that the customer scans at the Kiosk. The order is paid from the balance.
That is the whole loop. See the balance, top it up online, show the QR at the till. Everything below is the detail: how you configure it, what each setting does, and what your customers see at each step.
The customer signs in to your webshop, sees their balance in the top navigation, opens their account, and tops up with a card. The balance is the same one the Kiosk and POS already use, so credit loaded online is spendable in store immediately.
You can use the wallet separately without needing to configure a menu for online ordering.
Standalone cashless. The Click & Collect site exists purely as the place customers manage their money. There is no menu and nothing to order: a customer signs in, sees their balance, tops up, and then spends the credit in the restaurant by showing their Member ID QR code at the POS or the Kiosk. If a storefront has no stores enabled, it opens directly on the account page.
Combined with an ordering menu. The same wallet sits alongside a normal Click & Collect webshop. Customers browse the menu, order for pickup or delivery, and manage their balance in the same account.
You do not choose between them in a setting. It follows from whether the storefront has stores with a menu enabled, so you can start standalone and add ordering later without touching the wallet.
How it works: the big picture
The wallet belongs to the storefront, not to a store. One customer has one balance across the entire Click & Collect site. If your brand runs several locations, the same balance follows the customer to all of them: money loaded while ordering from one location is spendable in another location, and on the POS and Kiosk in either location. There is no per-store balance to reconcile and no transfer step.
Money flows like this:
- The customer enters an amount on the top-up page and picks an online payment method.
- Click & Collect creates a top-up sale against the POS you nominated in the Cashless settings, and sends the customer to the payment provider (Mollie, Viva wallet, or Yavin).
- The provider confirms the payment.
- Once the payment is confirmed, the balance updates and a Top-up line appears in the transaction history.
Top-up lines are booked at 0% VAT. Loading a wallet is not a sale of goods, the VAT is accounted for later when the customer actually spends the credit.
How to configure it
Part 1: Configuring cashless in the backoffice
Where to find it
Click & Collect > Point de ventes (the storefront list) > open your storefront > Cashless tab
Before you start: create a payment profile
The Cashless tab does not hold your provider credentials. It points at a payment profile, a named set of credentials you create once. Profiles live under:
Paramètres > Print & KDS > Profils de paiement tab
Or navigate from the Click & Collect navigation.
Create the profile before you configure cashless. The dropdowns in the Cashless tab only list existing profiles, so with none created there is nothing to select.
Press Créer un nouveau profil and pick the provider: Mollie, Viva wallet or Yavin.
Viva wallet needs a custom profile
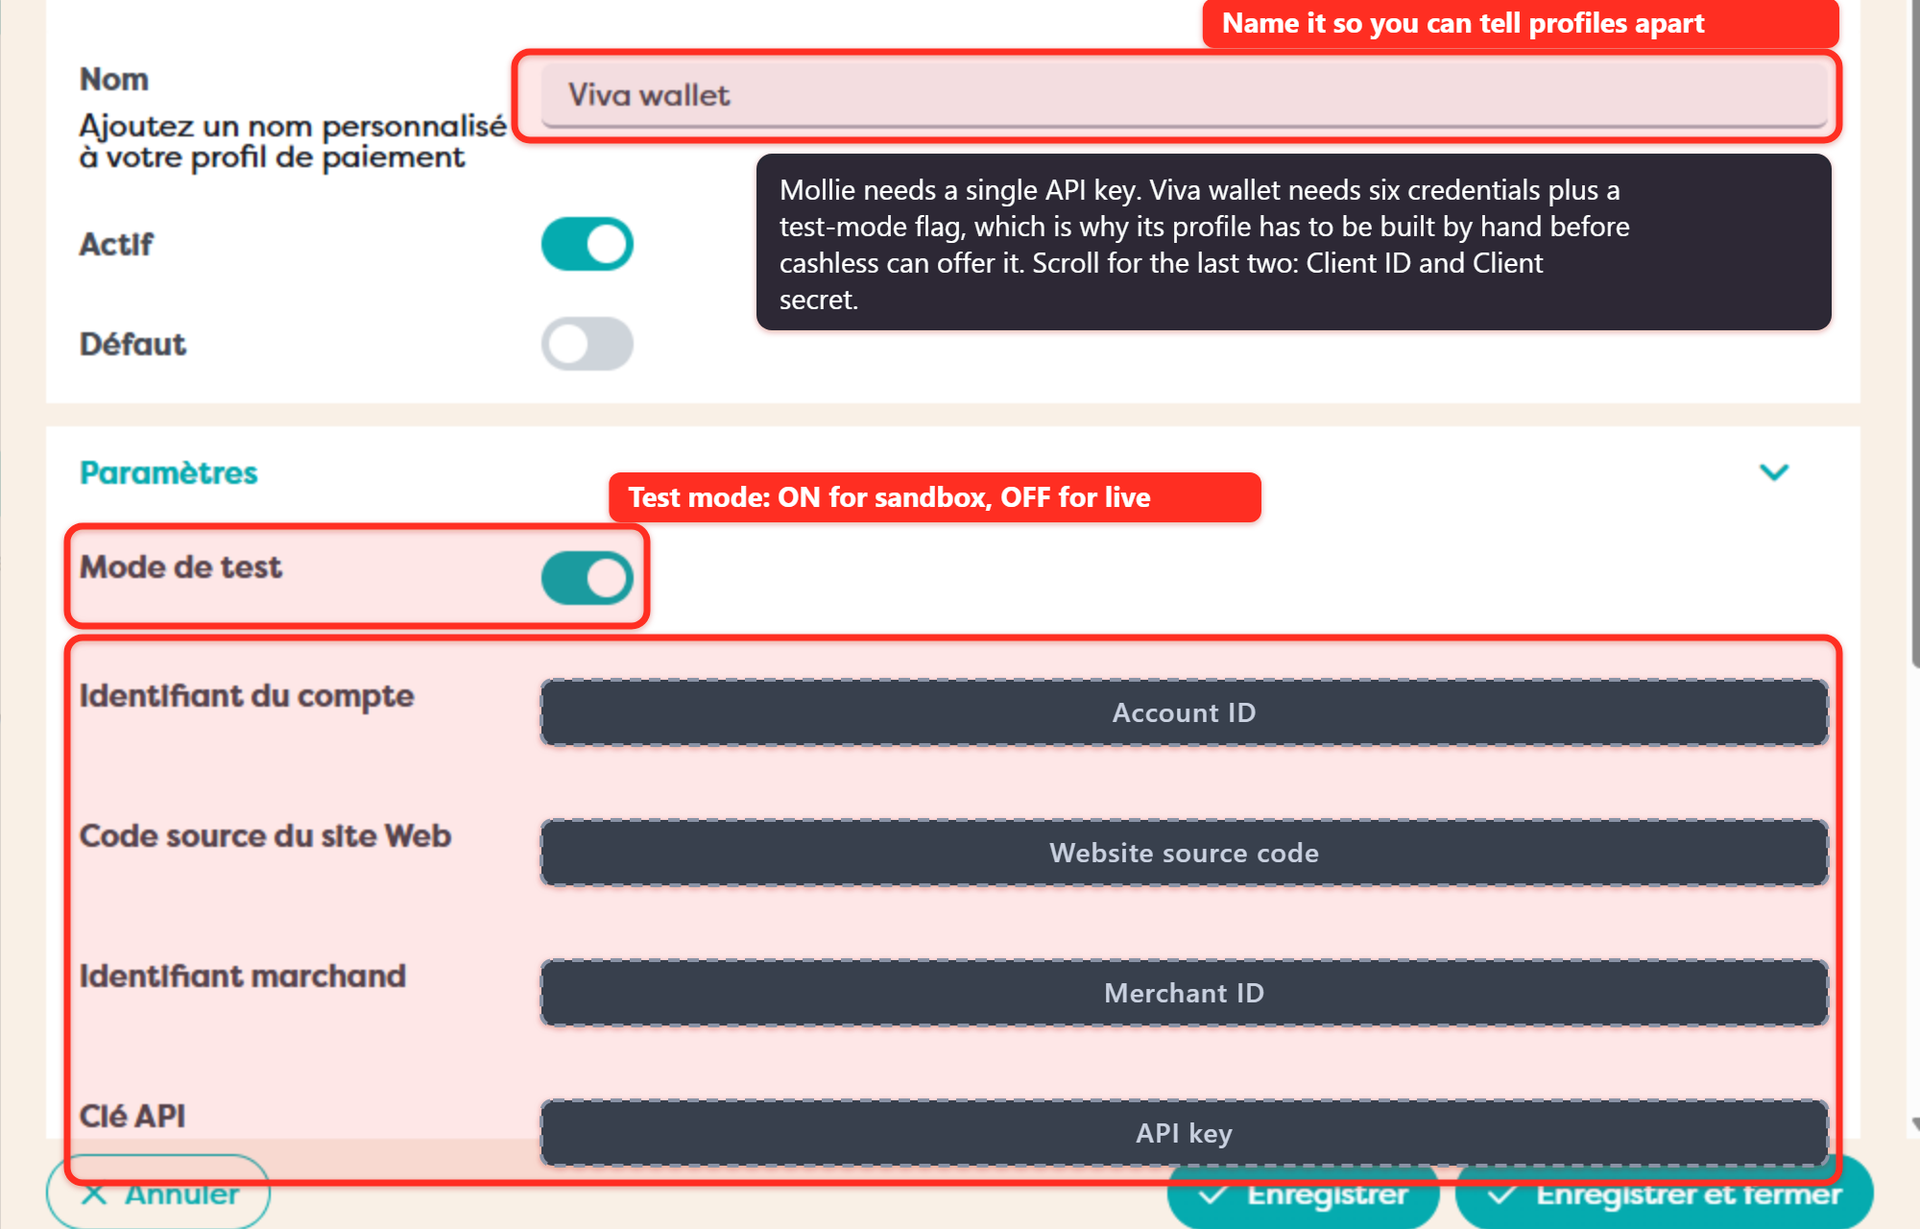
Collect these from the Viva wallet self-care portal before you start, then fill in the profile in the backoffice:
| Backoffice field | What it is | Where it comes from in Viva wallet |
| Nom | Your own label for the profile | You choose it. Name it Viva wallet - Cashless so it is obvious which profile the wallet uses, and so it cannot be confused with the Viva wallet profiles used for ordering or for Book |
| Actif | Whether the profile can be used at all | Leave on |
| Défaut | Whether this is the fallback profile for the organisation | Leave off unless you want every channel to use it |
| Mode de test | Sandbox versus live | Enable it with a live Vivawallet account |
| Identifiant du compte | Account ID | Viva self-care, your payment account |
| Code source du site Web | Website source code, the 4 digit code identifying the payment source | Viva self-care > Sales > Payment sources. Create a source for the webshop if you have none |
| Identifiant marchand | Merchant ID, a GUID | Viva self-care > Settings > API access |
| Clé API | API key | Viva self-care > Settings > API access |
| Identifiant client | Client ID for the smart checkout credentials | Viva self-care > Settings > API access > Smart checkout credentials |
| Secret client | Client secret, shown only once when generated | Same screen. If you did not save it, regenerate and update the profile |
Configure the Viva wallet side
Viva wallet also has to know where to send the customer back to, and where to notify Restomax that a payment happened. Both are configured in the Viva wallet self-care portal, not in the backoffice.
1. Create the payment source. In self-care, go to Sales > Payment sources and add a source for the webshop. This is what produces the 4 digit Code source du site Web you paste into the profile. Set its redirect URLs to:
| Outcome | URL |
| Success | https://redirection-handler.restomax.com?status=success |
| Failure | https://redirection-handler.restomax.com?status=failure |
2. Create the webhooks. Still in self-care, add a webhook for both of these events:
- Transaction Payment Created
- Transaction Failed
Point both at:
https://ws-cnc.restomax.com/api/v8/ClickAndCollect/Payment/VivaWalletWebHook/<AccountID>
Replace <AccountID> with your Identifiant du compte, the same Account ID you put in the profile. Unlike the redirect URLs, this one is different for every merchant, so double check you have pasted your own.
Finish in the backoffice
Once the profile is saved, go back to the storefront's Cashless tab, switch Viva wallet on, and select Viva wallet - Cashless in its dropdown. Always select a profile as well as the provider: the provider toggle on its own is not enough.
The three settings
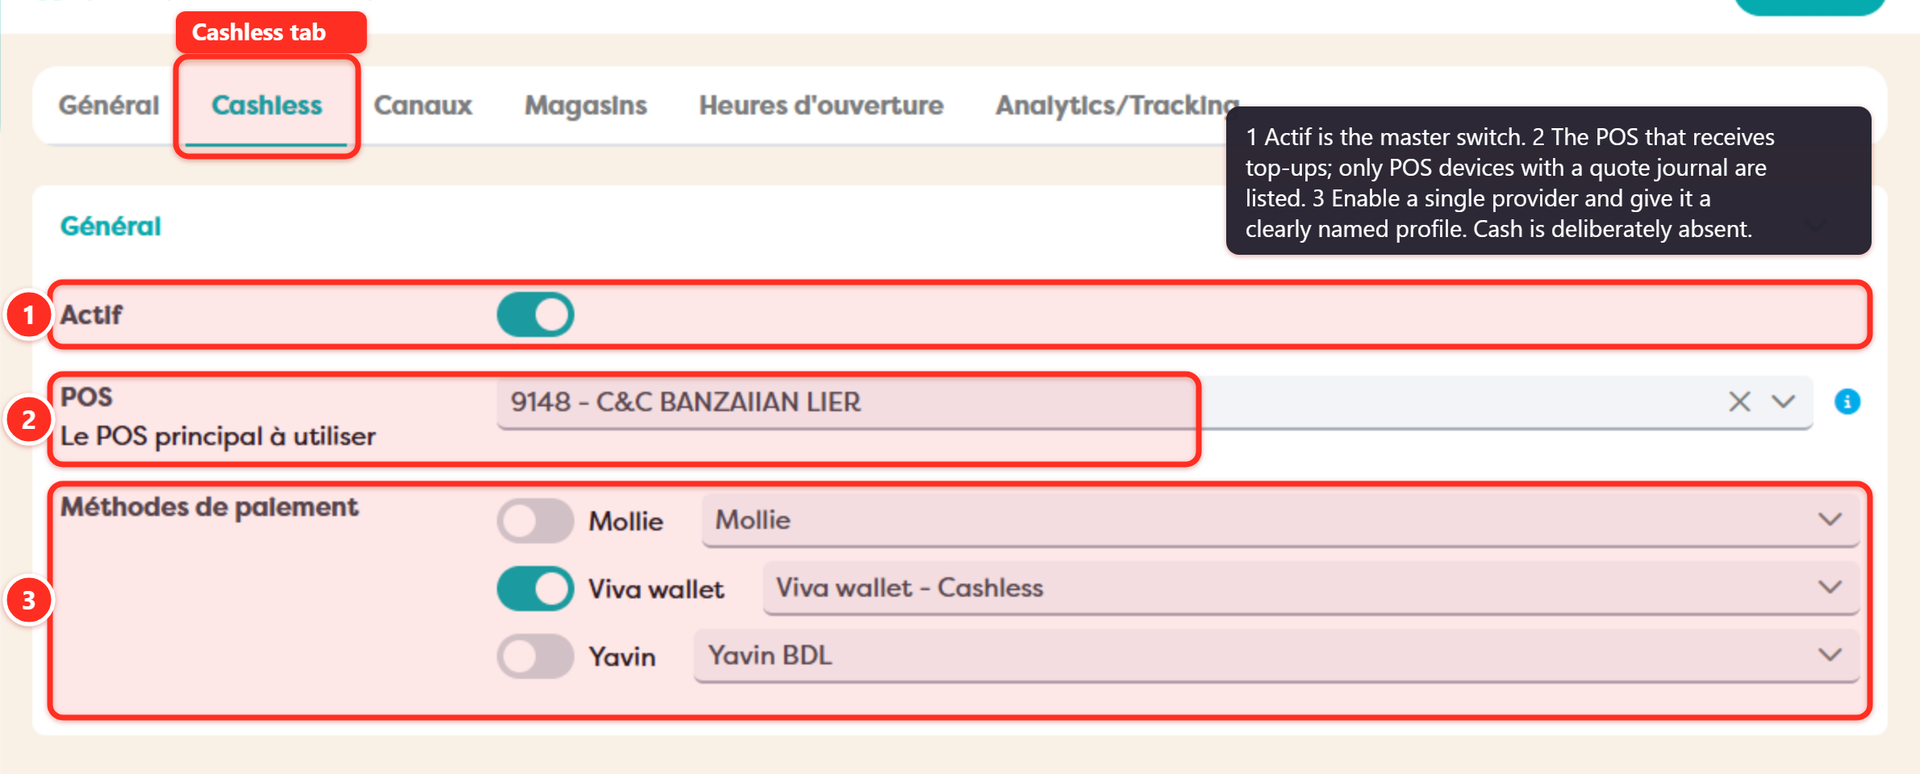
1. Activate
Make sure to activate the cashless wallet for your storefront
2. POS
Labeled Le POS principal à utiliser, "the main POS to use". Every top-up has to be booked somewhere, and this is the till that receives it.
The dropdown only lists POS devices that have a quote journal configured. If the POS you expect is missing from the list, that is why: there is no quote journal configured on the POS.
Example value: 9148 - C&C BANZAIIAN WAVRE.
3. Payment Methods
Which provider the customer uses to top up. Each row is a toggle plus a payment profile dropdown, so you choose both whether a provider is offered and which credentials it uses. The choices are Mollie, Viva wallet and Yavin.
Enable one payment method only. The top-up screen presents every enabled provider as a separate choice, and a single clear option is the smoothest experience for the customer. For this example that provider is Viva wallet, paired with the Viva wallet - Cashless profile.
A wallet top-up has to settle online, so there is no cash option here even though cash exists as a payment method elsewhere in Click & Collect.
Don't forget to save.
Turn the wallet on for the customer
The storefront settings decide whether the wallet exists at all. A second switch decides which customers have one, and it lives on the customer record:
Clients > open the customer with the pencil icon > Finance & comptabilité > Wallet cashless
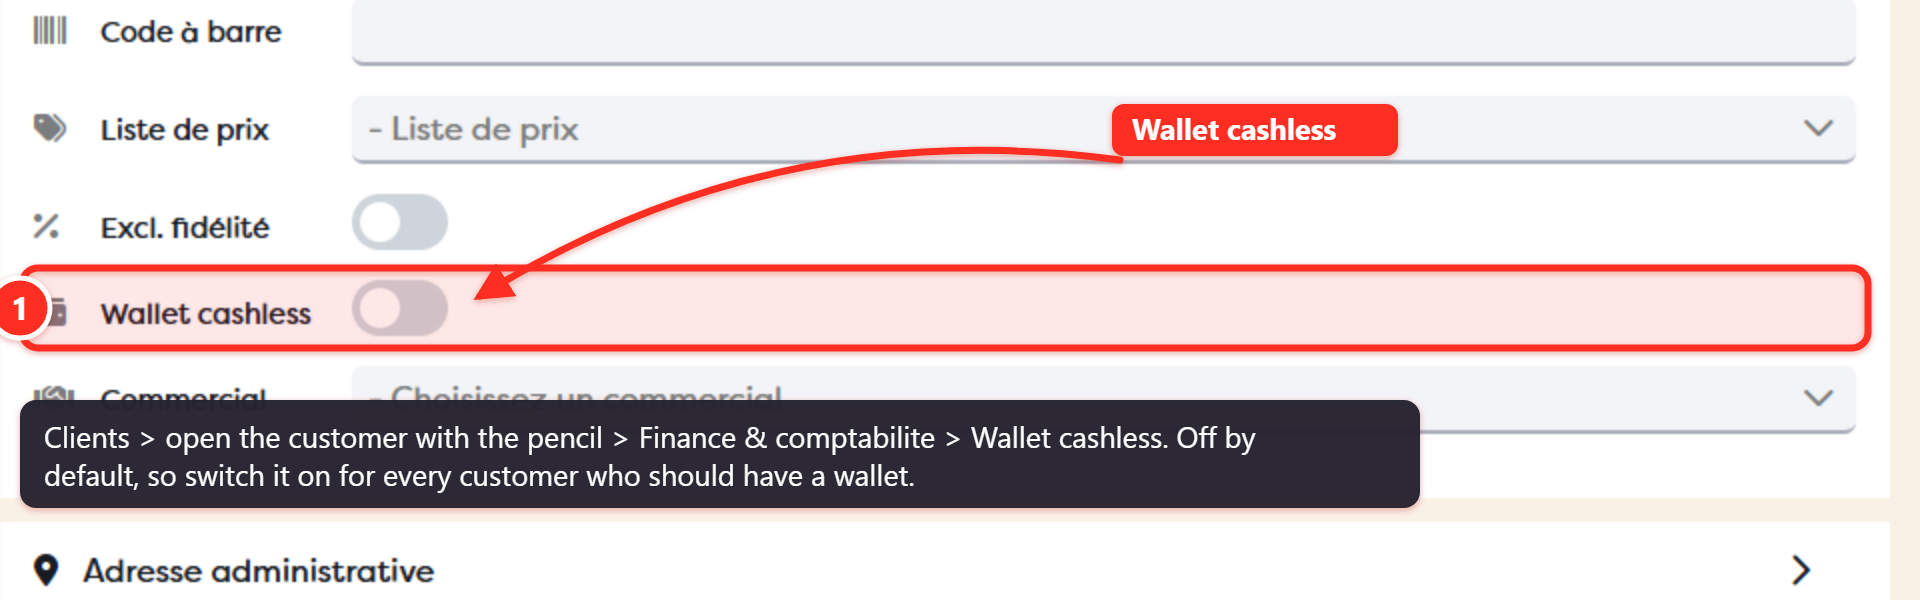
It sits just under Excl. fidélité, and it is off by default. Switch it on for every customer who should be able to hold a balance, then Enregistrer.
Part 2: What the customer sees
The balance in the navigation
Once signed in, the Account item in the top navigation shows the balance. On mobile the balance sits to the left of the avatar, with a small wallet icon. If cashless is switched off for the storefront, no balance is shown at all.
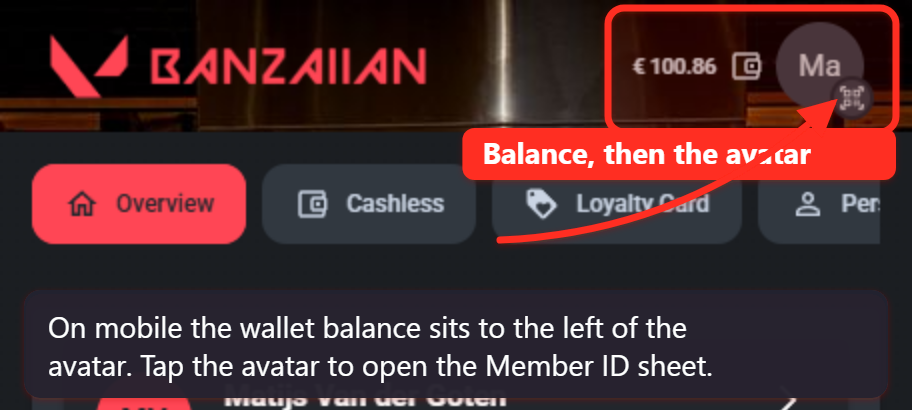
The Member ID: spending the balance in the restaurant
Tapping the avatar opens the Member ID sheet. This is how an online balance becomes usable at the counter.
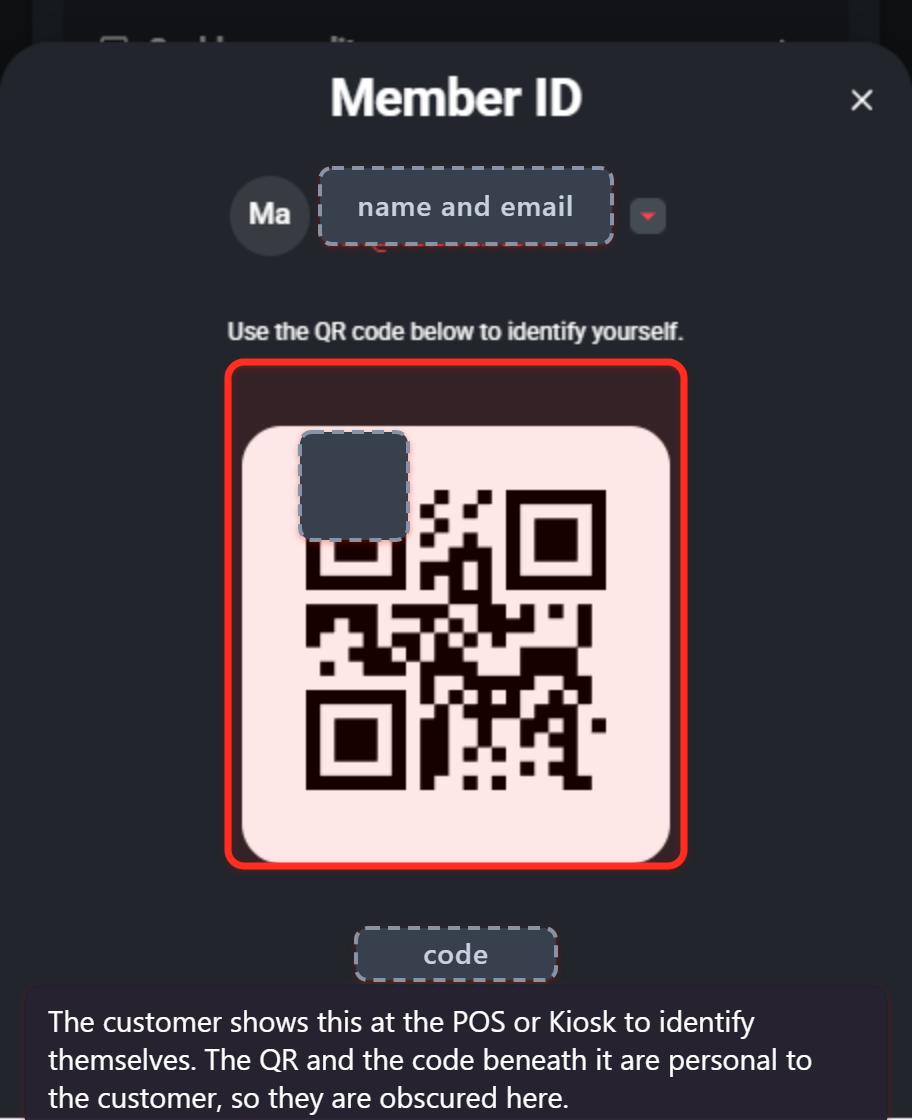
The sheet shows a QR code, and a short code underneath it. Staff scan the QR on the POS or the customer can scan it at the Kiosk, which identifies the account and lets the order be paid from the wallet balance.
The Cashless page
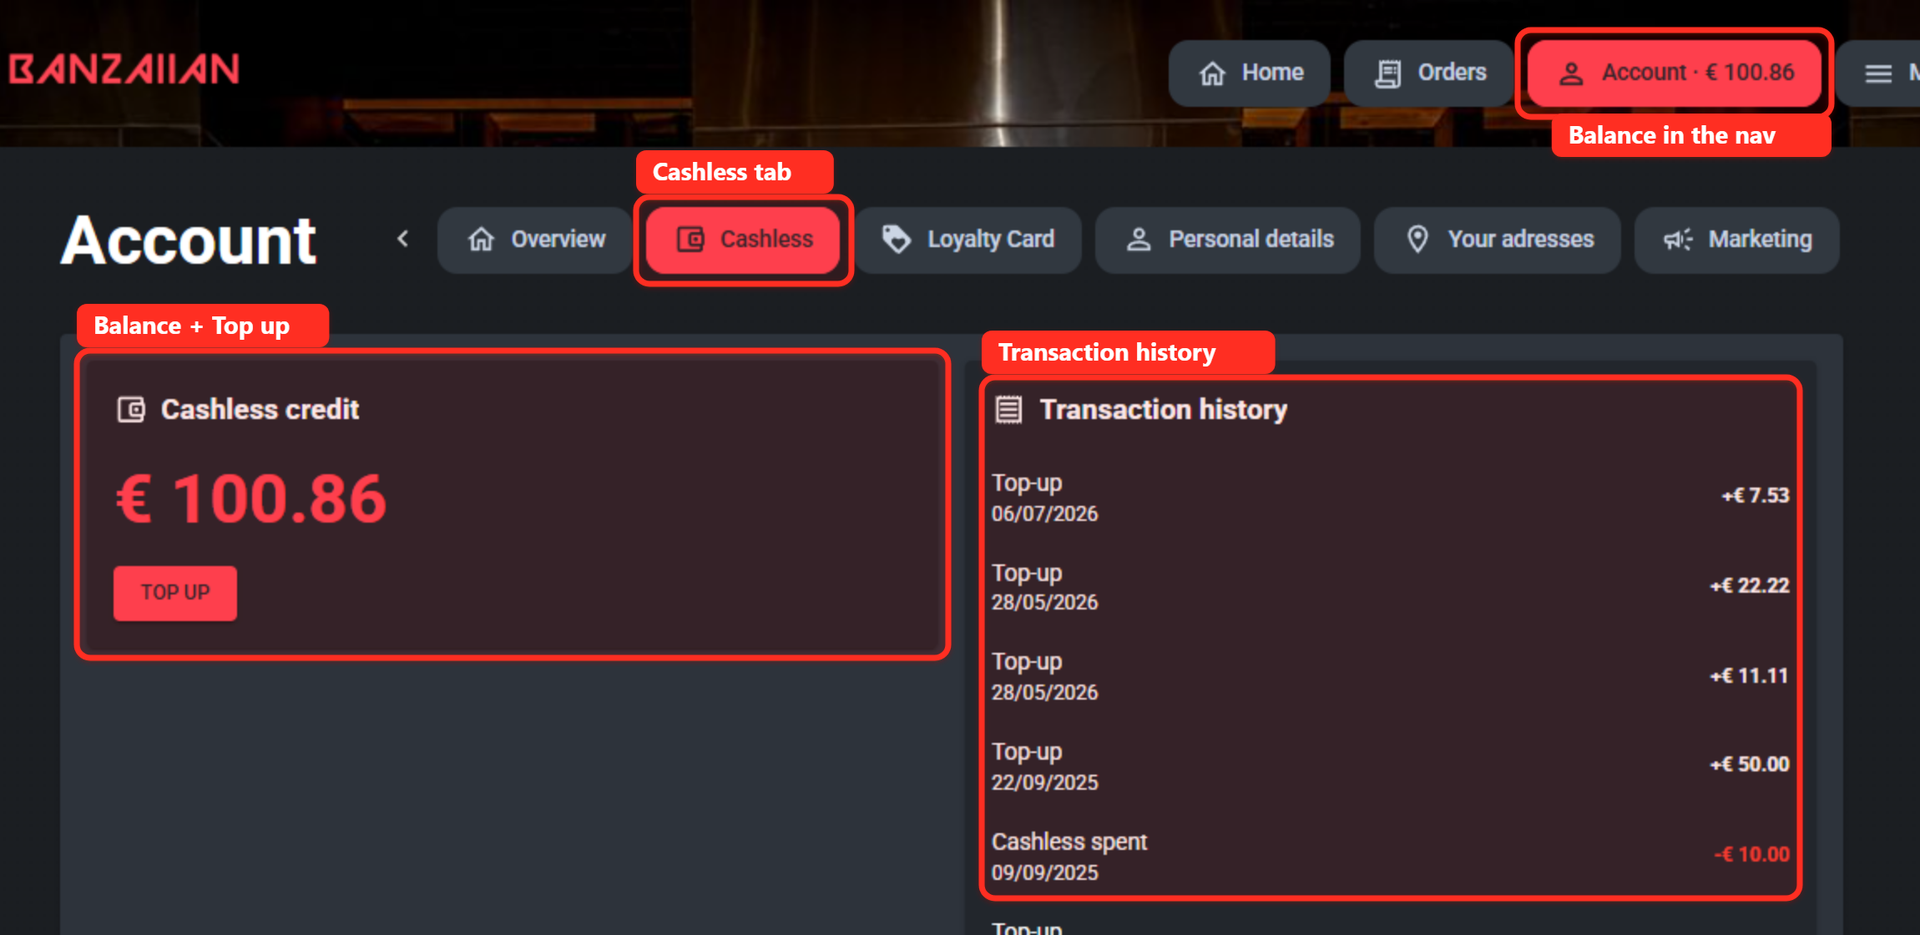
The Cashless tab in the account shows:
- Cashless credit with the balance in large type
- a Top up button
- Transaction history, newest first
Topping up
Top up opens a page to top up your cashless account.
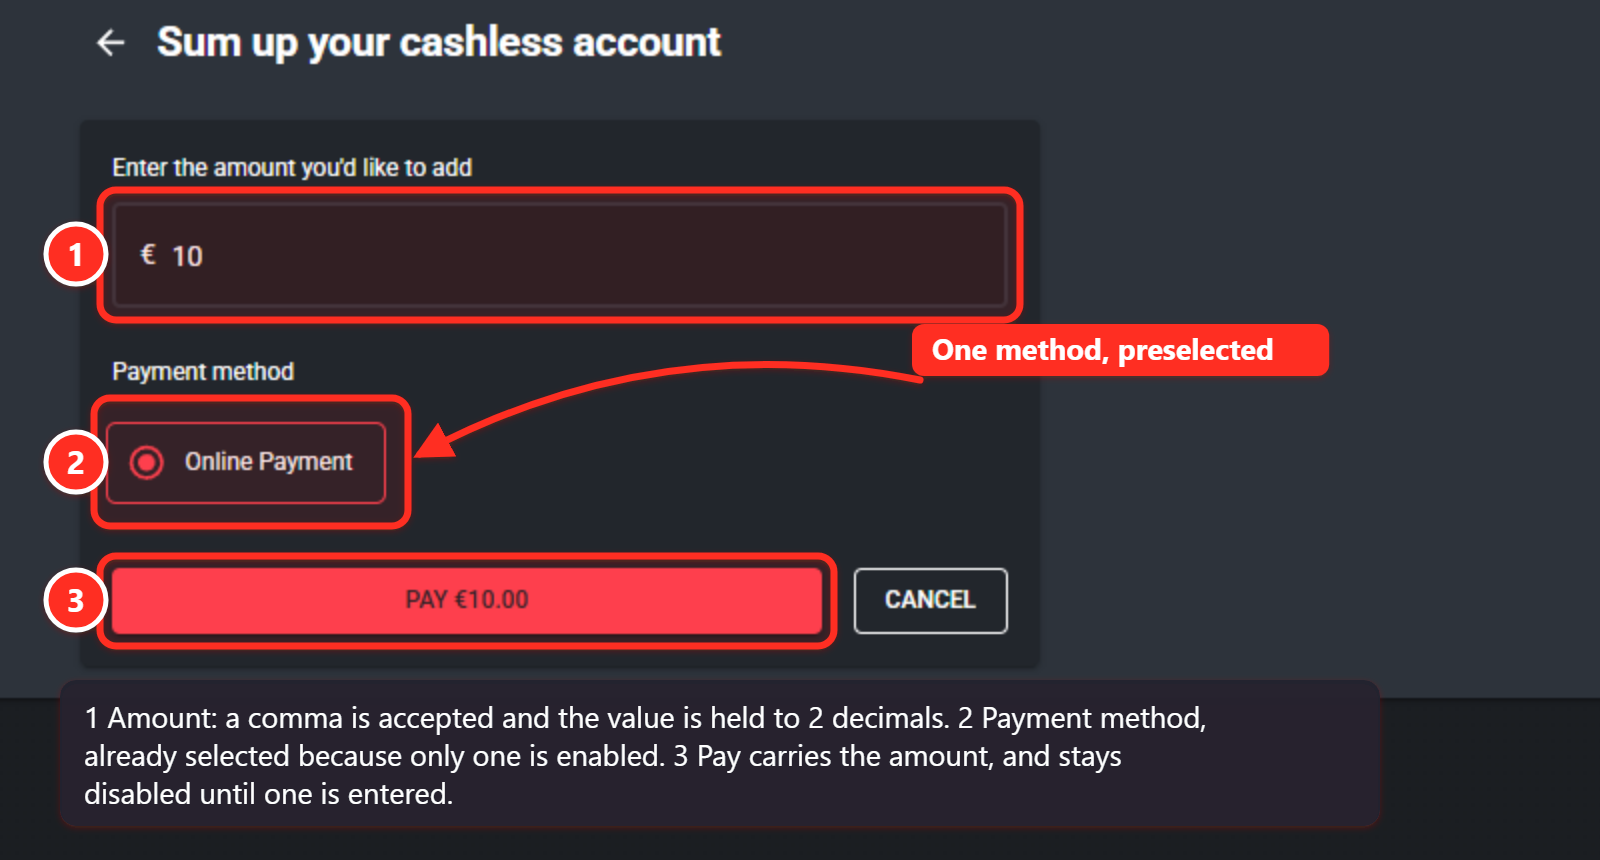
In the screenshot above the customer is adding 10.00 € to their balance.
- Enter the amount.
- Choose a payment method. Only the providers you enabled appear.
- Press Pay. The customer will be redirected to the payment providers screen to finish the payment.
- Cancel returns to the balance page without doing anything.
Part 3: Following the money in the backoffice
Four listings live under Dashboard > 05a. Compte Cashless:
| Report | What it answers |
| Cashless : Historique Consommation / Alimentation | Every movement, both top-ups and spending |
| Cashless : Hist. alimentation | Top-ups only |
| Cashless : Solde par voucher | Outstanding balance per voucher |
| Cashless : solde par client | Outstanding balance per customer |
Frequently asked questions
Do I need an online menu to use the wallet?
No. Cashless runs standalone: with no stores enabled the site opens on the account, and customers use it only to top up and check their balance, then spend it in the restaurant with their Member ID. You can add an ordering menu later without changing the wallet setup.
How does a customer pay with their balance in the restaurant?
They tap the avatar in the mobile header to open the Member ID sheet and show the QR code. Staff scan it on the POS, or the customer scans it at the Kiosk. If the screen cannot be scanned, the short code under the QR can be typed in instead.
Can a customer top up with cash online?
No. Top-ups settle through an online provider, so only Mollie, Viva wallet and Yavin can be offered. Enable just one of them.
A customer cannot see the wallet at all.
Check Wallet cashless on their customer record, under Finance & comptabilité. It is off by default and is separate from the storefront-level Actif switch.
I enabled Viva wallet but cannot select a profile.
There is no Viva wallet profile on your organisation yet. Create one under Paramètres > Print & KDS > Profils de paiement, fill in all six credentials from Viva self-care, save, then come back to the Cashless tab.
My Viva wallet top-up fails at the payment screen.
Check the VivaWallet profile credentials are correct.
The customer paid at Viva wallet but the balance did not move.
This is almost always the webhook. Check in Viva self-care that both Transaction Payment Created and Transaction Failed point at https://ws-cnc.restomax.com/api/v8/ClickAndCollect/Payment/VivaWalletWebHook/<AccountID> and that the identifier at the end is your Identifiant du compte, the Account ID. Click & Collect only credits the wallet once the webhook confirms the payment.
The customer is not returned to the webshop after paying.
Check the payment source redirect URLs in Viva self-care: https://redirection-handler.restomax.com?status=success and the same address with ?status=failure.
Why is my POS missing from the POS dropdown?
The list only includes POS devices that have a quote journal. Configure the journal on the POS and it will appear.
Why is the top-up booked at 0% VAT?
Loading a wallet is not a sale. VAT is applied when the credit is spent on actual products.
A customer paid but the balance did not move. What happened?
The payment provider's webhook had not confirmed the payment yet. Click & Collect waits for the real status and shows a message asking the customer to contact you rather than claiming success. Check the payment in the provider's dashboard, and check the Cashless history listing in the backoffice.
Can I turn the wallet off without losing balances?
Yes. Actif controls whether the wallet is shown in the webshop. Existing balances are untouched and remain spendable on the Kiosk and POS.